Many eCommerce stores begin as a single store selling particular products or services. Over a period time, when the business expands, they may have more than one product line. They may also expand to other lucrative geographies. As your business is growing, you need a separate store for a specific country or region and have the ability to manage inventory from one system. That means that you need an eCommerce platform that comes out of the box with multi-store view functionality. Among the numerous eCommerce platforms in the market, Magento 2 is one of the best solutions for multi-store views functionality.
With Magento 2 multiple store views, it is convenient to expand your business by targeting different countries and regions. Each store can be optimized locally by creating localize content and offering local currency of the target country to attract local visitors. You can also offer products and payment methods appropriate for specific countries.
Following are steps to Multiple Store views in Magento 2.
Select the Store Domain
First, you need to determine how you want to place the store. Will the stores share the same domain? or will they have distinctly different domains? For each store, do one of the following:
- Set up a subdomain of your primary domain.
- Set up a different primary domain
Add the New Store
- On the Admin Panel, Select Stores > Settings > All Stores.
- Click on “Create Store”, then follow the below steps:
Select the Website that is the parent of the new store. If there is only one website, use the default “Main Website then fill the name for the new store for the internal reference.”
In the Root Category field, you need to set the root category for the main menu of the new store. Select one of the generated root categories for the store from the dropdown list and save Store.
Add a Default Store View
Click on “Create Store View” and follow steps:
- Assign the Store to the new store you’ve just created.
- Set the Name for the store view and Type the Code for the store view with lower characters.
- Choose “Enabled” for the Status.
Setup the Store URL
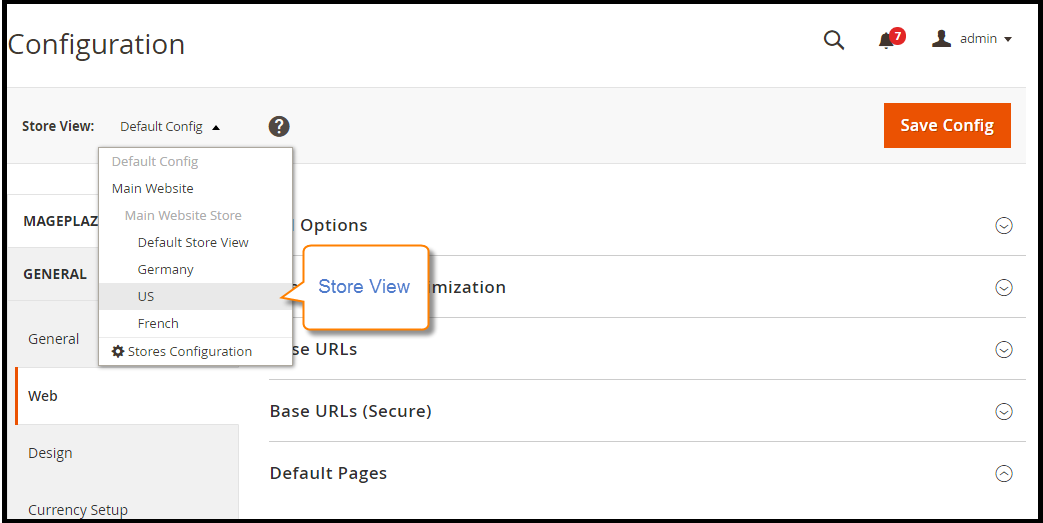
- On the Admin Panel, go Stores > Settings > Configuration.
- Select “Web” under General tab on the left panel.
- Choose the Store View to check the new store you added In the upper-left corner.
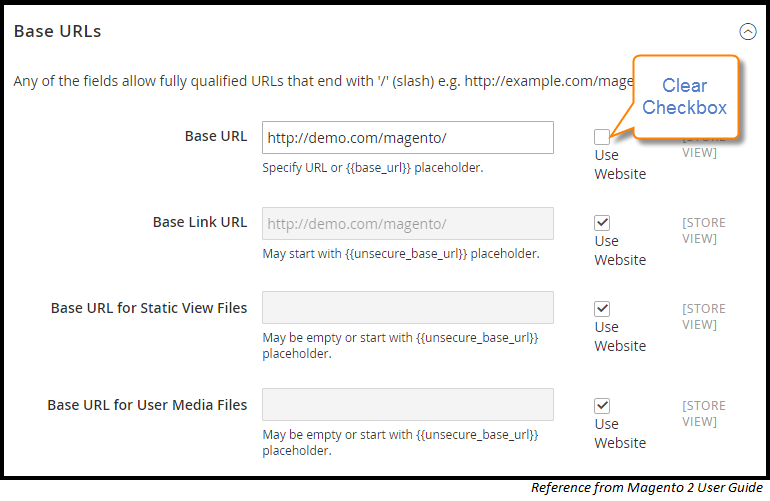
- Select OK to verify the scope switching then Open the Base URLs section,
- Clear the “Use Website” checkbox that is next to the Base URL field.
- Change the “Base URL” for the store.
- Open the Secure Base URLs section below to set the store’s secure URL if needed and Save Config to complete the process.
Magento 2 Multiple Store View can be helpful to widen your range of customers and improve the shopping experience for your customers who speak different languages as their essential language. Creating Magento 2 Multiple Store views sites is an excellent way of helping customers to easily checkout with their store view currency when shopping, increasing sales, your market reach, and developing a significant advantage for your customer. You are offering your customers everything under one roof and that is one of the most crucial reasons behind the big success achieved by leading Multiple Store views eCommerce running today.


