
SwiftLint is a tool for analyzing Swift code style that helps identify stylistic mistakes in the code. The style guide guidelines that are widely acknowledged by the Swift community are enforced by SwiftLint. Coding style guidelines can be established by developers and enforced during development. If the code breaks any of the linting rules, it will display errors and/or warnings.
Why Developers Use SwiftLint in iOS Application Documentation – Simple Reasons
Consistency:- Swiftlint offers pattern, indentation, space, style, and naming consistency. These characteristics make code easier to deal with and allow for speedier, more confident development. Your peers can’t support and grow a codebase if they can’t create the proper structure because of inconsistent code.
Readability: Code should be written and presented such that team members, especially new ones, can readily read and understand it. When SwiftLint detects violations of any rules about patterns, indenting, spacing, style, and naming, it generates errors or warnings so you may concentrate on the essential features.
High-quality code is helpful while working in a team since it produces errors and warnings when it is not up to par. SwiftLint analyzers assess a codebase’s quality and produce errors and warnings if any of the code deviates from the linting guidelines.
SwiftLint is a command-line tool that works by analyzing your Swift code against a predefined set of rules. These rules cover various aspects of coding style and best practices, including naming conventions, whitespace usage, line length, and more. It integrates seamlessly with Xcode and can be configured to run automatically during the build process, offering real-time feedback directly within the IDE.
Key Aspects of SwiftLint:
- Linting Rules: SwiftLint comes with a comprehensive set of default rules, and it allows you to customize these rules according to your team’s coding standards through a configuration file (.swiftlint.yml).
- Integration with Xcode: SwiftLint can be added as a Run Script Phase in Xcode, ensuring that linting checks are performed every time you build your project.
- Automated Feedback: By highlighting style violations and potential issues in real-time, SwiftLint helps developers correct mistakes as they code, leading to higher code quality and consistency.
- CI/CD Integration: SwiftLint can be integrated into continuous integration and continuous deployment (CI/CD) pipelines to enforce coding standards automatically across all code contributions.
Steps to Integrate SwiftLint with an iOS App using Swift Package Manager
Step 1: Add SwiftLint as a Swift Package Dependency
- Open Your Project in Xcode:
- Open your Xcode project or workspace.
- Add the SwiftLint Package:
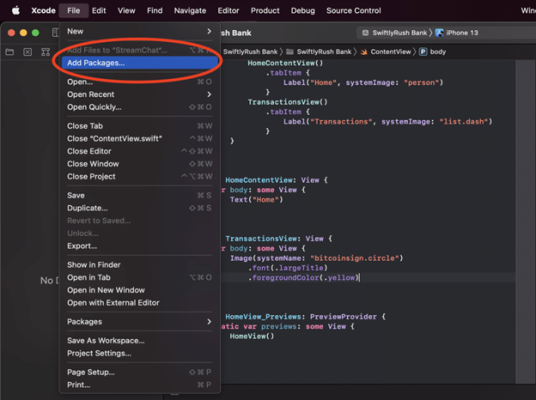
- Navigate to File > Add Packages….
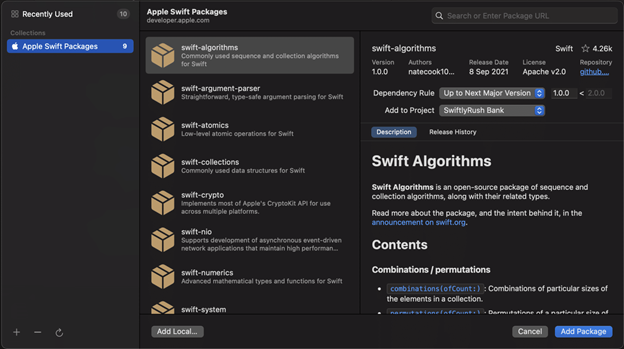
- In the search bar, enter the SwiftLint repository URL: github SwiftLint git
- Choose the version you want to install (or select the latest version).
- Click Add Package.
Step 2: Configure SwiftLint
Create a SwiftLint Configuration File:
- In the root of your project directory, create a file named .swiftlint.yml.
- Customize this file according to your linting rules. Here’s an example configuration
disabled_rules: # rule identifiers to exclude from running - line_length - trailing_whitespace
opt_in_rules: # some rules are only opt-in - empty_count
included: # paths to include during linting. `--path` is ignored if present. - Source
excluded: # paths to ignore during linting. Takes precedence over `included`. - Carthage - Pods
line_length: warning: 120 error: 200
identifier_name: min_length: 3 max_length: 40
type_name: min_length: 3 max_length: 40
Step 3: Run SwiftLint During Build
Add a Run Script Phase:
- Open your Xcode project.
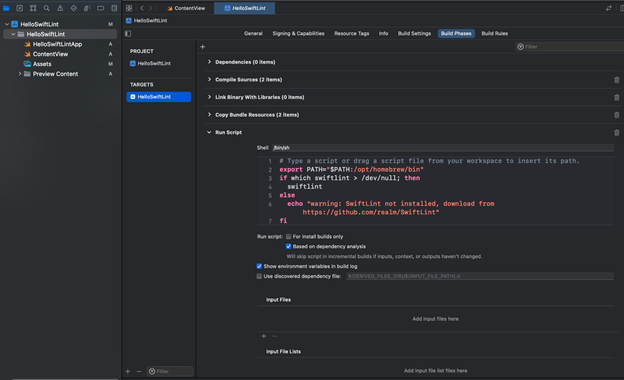
- Select your target, then navigate to the Build Phases tab.
- Click the + button at the top of the Build Phases list and select New Run Script Phase.
- Move the new Run Script Phase to be the first phase in the list to ensure it runs before any build steps.
- Expand the Run Script Phase and enter the following script
if which swiftlint >/dev/null; then swiftlint
else echo "warning: SwiftLint not installed, download from https://github.com/realm/SwiftLint"
fi- Ensure the script phase runs only for appropriate build configurations, such as Debug.
Step 4: Verify Installation
- Build Your Project
- Build your project (⌘B) to ensure SwiftLint runs during the build process.
- Check Build Logs
- Review the build logs for any linting warnings or errors reported by SwiftLint.
By following these steps, you integrate SwiftLint into your iOS project using Swift Package Manager, enabling automated code style and convention checks. This integration helps maintain a consistent codebase and improves overall code quality.
Conclusion
Hire dedicated Swift developers as they are experienced and skilled in using the open-source SwiftLint. Developers are required to follow code standards and styles. It is free to use as a Swift package manager and in quick projects as it is easier to set up. This is a terrific tool for anyone who wishes to produce better, easier-to-maintain code. It also aids in the learning and adjustment of new team members to coding standards.