
Unit testing for Android allows us to test a specific section of code to ensure that it meets our requirements. The code fragment is pushed to the repository to be combined with the current code if it passes. If it doesn’t work, the developers correct the problem and try again until it does.
One of the most useful aspects of developing Android apps is unit testing, which helps us save a tonne of time and money on the project as a whole.
Small code components, such as methods or classes, are usually the subject of these tests, which are conducted separately from the application as a whole. Developers should think about including the following three tests in their test suites:
1. UI Tests: These tests validate the user interface of an application. There’s Espresso.
2. Instrumented Tests: These tests employ APIs from the Android framework to run on real or emulated Android devices to verify user behaviors like button clicks. Espresso & AndroidX Tests are frequently used for the same purpose.
3. Unit Tests: Unit tests are crucial for ensuring that every operation and process in the application is tested. The most popular tools for unit testing are Hamcrest, Mockito, and JUnit.
Verifying the correctness of code is the primary goal of unit testing, which aims to fix issues early in the development cycle. This blog will explain Mockito and walk through how to use it for unit testing in Android applications.
Steps: Unit Testing Using Mockito in Android
Let’s take a simple example of computations like addition, subtraction, etc to understand the Mockito framework.
We will create a file ComputationActivity.kt to display all computations upfront. For managing all operations we will create object class Operations.kt which will be passed to ComputationActivity class as a param in the primary constructor.
To Add Mockito to Your Project (Using Android Studio and Gradle):
build.gradle.kts(app level)testImplementation ("junit:junit:4.13.2")
testImplementation ("org.mockito:mockito-core:2.25.0")
testImplementation ("org.mockito:mockito-inline:2.13.0")build.gradle(app level) testImplementation 'junit:junit:4.13.2'
testImplementation 'org.mockito:mockito-core:2.25.0'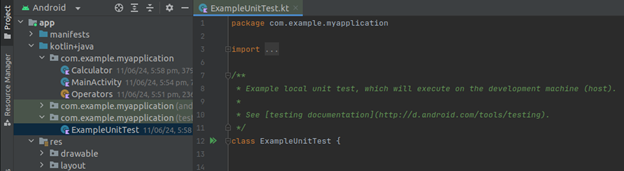
testImplementation 'org.mockito:mockito-inline:2.13.0'- Folder structure for adding ExampleUnitTest.kt file for testing MainActivity.kt class.
By default, module-name/src/test will be having source files for local unit tests.
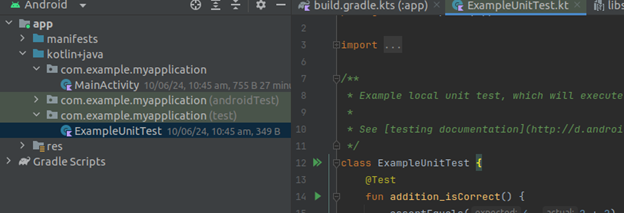
Now, we will add test functions in our ExampleUnitTest.kt file
- @RunWith – we have annotated with MockitoJUnitRunner::class which means it provides the Runner to run the test.
- @Mock– Using @Mock annotation we can mock any class. Mocking any class is nothing but to create a mock object of a particular class.
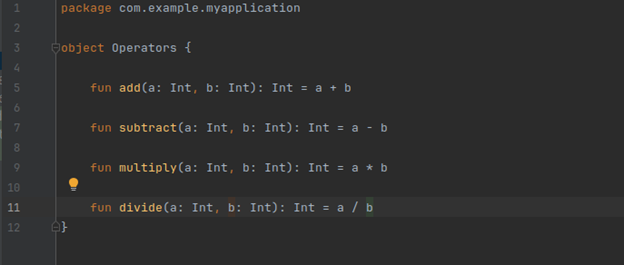
Here, Operators is a object which has set of functions of calculator operations
and Calculator is a class,
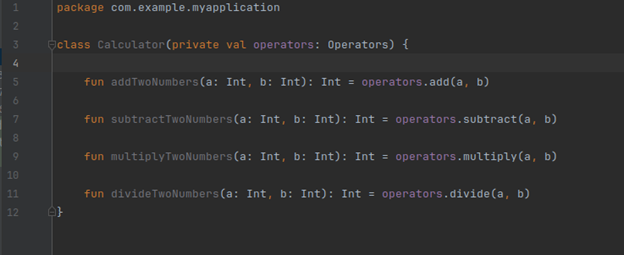
Here, Calculator is mockito example that takes the operator object as a parameter in the primary constructor. So, we return operator function as return param for the functions in the Calculator class.
Let’s Start Testing the Calculator Class,
Inside the test folder, we will create a package called calculator same as we did in the java folder.
In that, we will create only one class called CalculatorTest.kt.
Here, you can see we have not created OperatorsTest as we have to test only CalculatorTest here.
So, in Calculator Test,
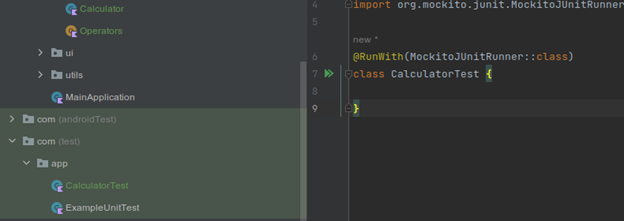
Here, we have annotated with MockitoJUnitRunner::class that means it provides the Runner to run the test.
Now, we will setup the calculator class
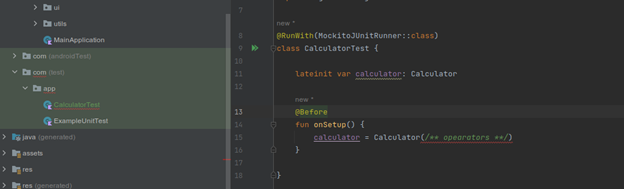
Here, in construct we need to pass the operators. So, we won’t create an object of the operator as,
- We want to perform the test in isolation so that even if the Operators crashes, it should not impact the test being performed in CalculatorTest.
- We have to just have the invoke methods of the Operator class and do external communication.
Also, @Before means, that even before performing the test we need to setup the dependency.
So, here we have to mock the operator like,
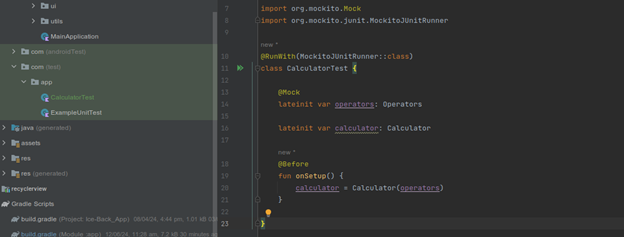
In Mockito, we mock any class using @Mock annotation.
By Mocking any class, we are creating an mock object of that speicifc class. In the above code, Operators is mocked to provide dependency for Calculator class. Now, lets perform some test now,
Here, to perform tests we need to annotate the function with @Test.
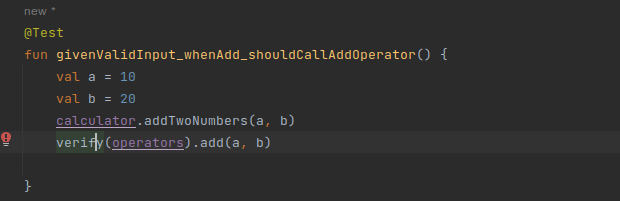
Now, we will create two variables, a and b with values 10,20 and then we will call,
calculator.addTwoNumbers(a, b)
and to verify if the correct function was called or not from the mocked class, we will just use,
verify(operators).add(a, b)
Here, verify means that you want to check if a certain method of a mock object has been called or not.
Now, to run the test we can click on the function like,

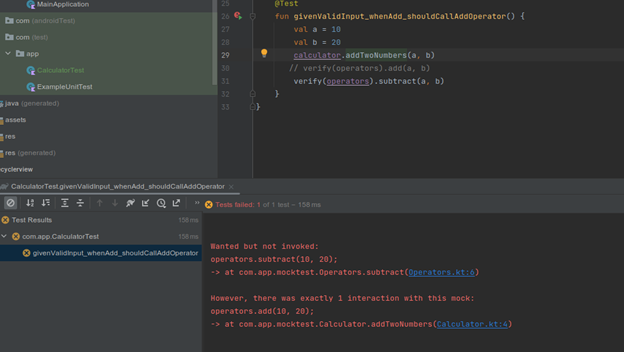
Now, to fail the case, just replace
verify(operators).subtract(a, b)
Now, to run test on all the functions,
import com.app.mocktest.Calculator
import com.app.mocktest.Operators
import org.junit.Before
import org.junit.Test
import org.junit.runner.RunWith
import org.mockito.Mock
import org.mockito.Mockito.verify
import org.mockito.junit.MockitoJUnitRunner
@RunWith(MockitoJUnitRunner::class)
class CalculatorTest { @Mock lateinit var operators: Operators lateinit var calculator: Calculator @Before fun onSetup() { calculator = Calculator(operators) } @Test fun givenValidInput_whenAdd_shouldCallAddOperator() { val a = 10 val b = 20 calculator.addTwoNumbers(a, b) verify(operators).add(a, b) } @Test fun givenValidInput_whenSubtract_shouldCallSubtractOperator() { val a = 10 val b = 20 calculator.subtractTwoNumbers(a, b) verify(operators).subtract(a, b) } @Test fun givenValidInput_whenMultiply_shouldCallMultiplyOperator() { val a = 10 val b = 20 calculator.multiplyTwoNumbers(a, b) verify(operators).multiply(a, b) } @Test fun givenValidInput_whenDivide_shouldCallDivideOperator() { val a = 10 val b = 20 calculator.divideTwoNumbers(a, b) verify(operators).divide(a, b) }
}
Conclusion
This blog discussed using Mockito for unit testing Android applications. Mocking is a potent tool for creating efficient Android unit tests. It enables you to independently verify the behavior of distinct code units, resulting in more dependable and manageable tests.
Because unit testing identifies defects early in the development process and makes refactoring and code modifications easier, Android applications need to be reliable, maintainable, and stable. If you also want to use Mockito development for Android unit testing, hire Android developers with CMARIX.